
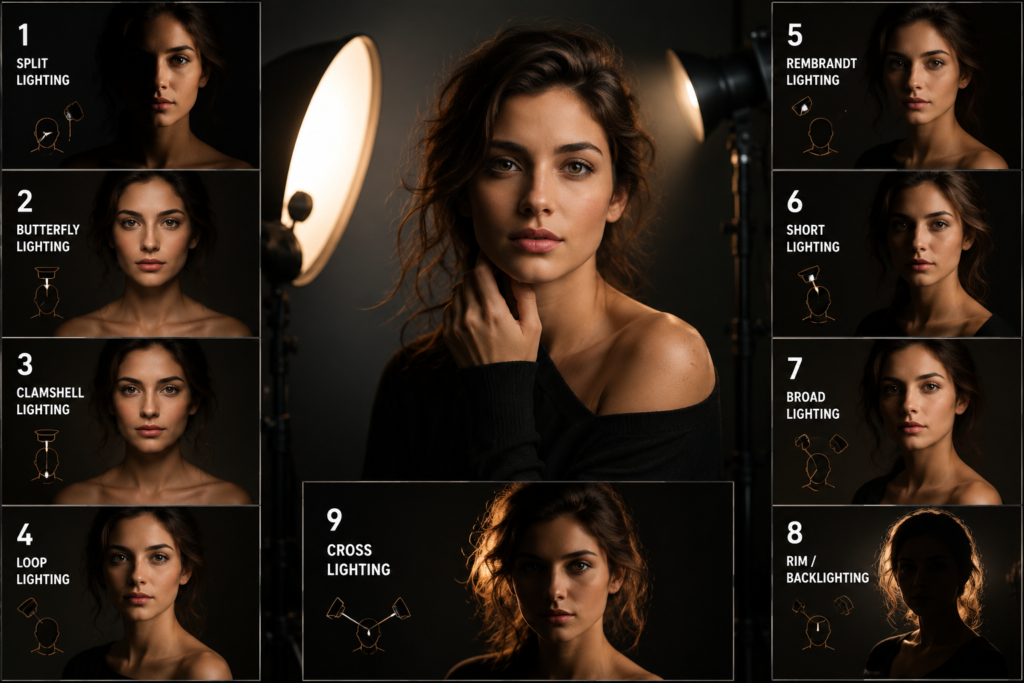
Great photography services are not only about having a nice camera or getting an appealing background. Light plays a major part in forming the subject, managing shadows, building depth, and developing the emotional tone of an image. Understanding portrait lighting patterns helps photographers make intentional decisions rather than relying on trial and error. Whether you work with studio flashes, window light, reflectors, or natural sunlight, these methods can help you create portraits that feel polished and visually balanced.
What Are Lighting Patterns in Portrait Photography?
A lighting pattern describes how light and shadow appear across a subject’s face. Tiny changes in the position or height of a light source can dramatically evolve the appearance of a portrait.
The same subject can look soft and approachable beneath one setup and dramatic or mysterious under another. Because of this, learning different lighting setups is useful for both beginners and experienced photographers.
Before transforming your lighting setup, consider your subject’s facial details, the mood you need to create, the background, and the purpose of the portrait. There is no separate pattern that works best for every person or situation
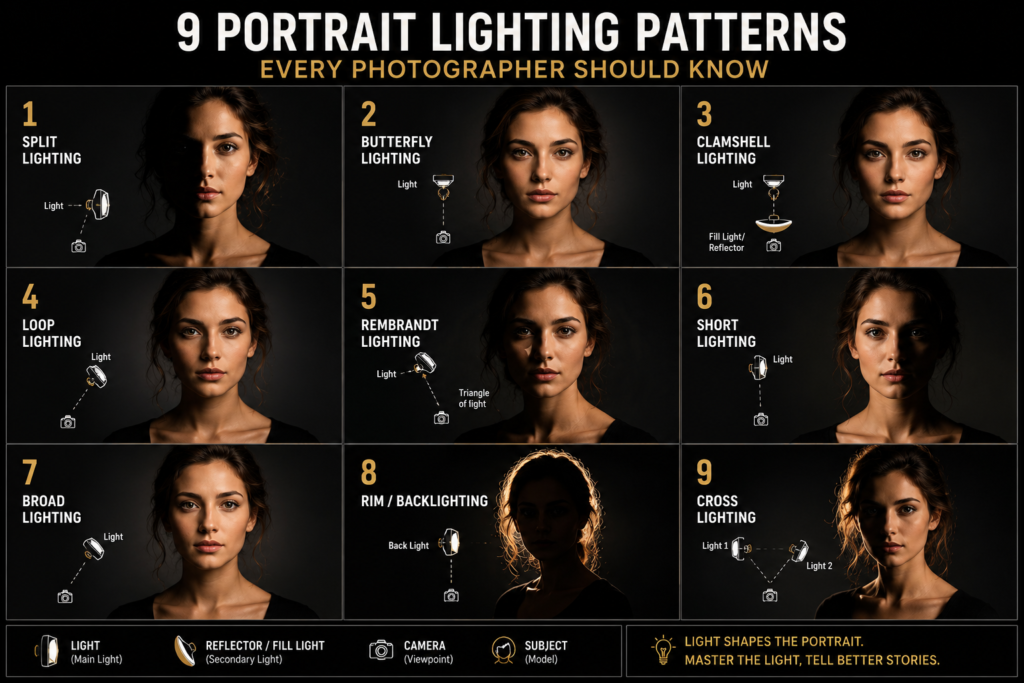
1. Split Lighting
Split lighting splits the face into two noticeably different areas, with one side illuminated and the other falling into shadow. The primary light is placed approximately to the side of the subject.
This setup is valuable when you need a dramatic, powerful, or serious appearance. It can add strong contrast and definition to a portrait, although the pronounced shadows might not be perfect when you need an especially soft and flattering result.
For a less dramatic appearance, move the light slightly in the camera and use a reflector to gently brighten the shadowed side
2. Butterfly Lighting
Butterfly lighting places the primary light in front of and slightly above the subject. The position creates a small shadow beneath the nose that can resemble the shape of a butterfly.
This is a popular choice for classic headshots and beauty portraits because it can produce an elegant appearance while maintaining clear facial definition.
Pay attention to the height of the light. If it is positioned too high, the eyes can become heavily shadowed. Lowering the source until you see a small catchlight in the eyes can make the portrait feel more lively.
3. Clamshell Lighting
Clamshell lighting builds on the butterfly setup by adding a reflector or second light source beneath the subject’s face. The two sources create a lighting arrangement that resembles an open clamshell when viewed from the side.
The lower fill reduces severe shadows underneath the nose, chin, and eyes. As a result, this technique is especially valuable for beauty portraits, professional headshots, and images where a smooth and polished appearance is important.
You can control the contrast by adjusting the distance or intensity of the lower fill
4. Loop Lighting
Loop lighting is one of the most versatile choices for everyday portrait work. The main light is positioned slightly above eye level and somewhat to one side of the subject.
It creates a small, curved shadow beside the nose while keeping the face relatively well illuminated. Because the effect is subtle, it works best for family portraits, professional images, personal branding, and other situations.
The accurate position can be adjusted according to the subject’s facial structure. Minor changes in angle can create a surprisingly noticeable difference.
5. Rembrandt Lighting
Named after the famous Dutch painter Rembrandt, this technique is recognized by a small triangular patch of light appearing on the cheek of the shadowed side of the face.
The main light is placed higher and to one side, letting the nose shadow connect visually with the cheek shadow. This brings depth, dimension, and a distinctly dramatic character.
Rembrandt lighting is specifically effective when you need a portrait to feel artistic or cinematic. However, the stronger contrast means that it might not be perfect for every subject or style.
6. Short Lighting
Short lighting illuminates the side of the face that is turned toward the light while setting more of the visible face in shadow.
Because a larger portion of the face stays darker, the method can make a more sculpted appearance. It can also visually narrow the face, making it valuable when you need stronger facial definition.
The key is to prevent losing too much detail in the shadows. A reflector or low-powered fill light can help maintain texture without eradicating the dramatic quality.
7. Broad Lighting
Broad lighting works almost opposite to short lighting. The subject turns so that the broader, more visible portion of the face gets the main light.
This produces a brighter and more open appearance and can make the face appear visually wider. It can be best for subjects who need a brighter, more welcoming portrait.
However, because more of the face is illuminated, it may emphasize width. Photographers must therefore consider both the subject’s features and the desired visual effect before choosing this setup.
8. Rim or Backlighting
Backlighting places the main light source behind the subject. Rather than primarily illuminating the face, the light can outline the hair, shoulders, or body with a glowing edge.
This technique can make an elegant division between the subject and background. It is especially effective during outdoor sessions when the sun is placed behind the subject.
A reflector or additional front-facing light can be introduced if you want to keep facial detail. Alternatively, allowing the face to become darker can make a striking silhouette.
For photographers creating memorable milestone sessions, thoughtful lighting can assists transform ordinary places into images with a powerful sense of atmosphere and personality.
9. Cross Lighting
Cross lighting combines light sources placed on opposite sides or angles of the subject. A key light can illuminate one side while another source makes an edge or rim effect from the opposite direction.
The result can give firm separation, dimensionality, and visual depth. This setup is usually useful for creative portraits where you need the lighting itself to become a significant part of the composition.
Because multiple lights are involved, pay close attention to their intensity and direction. Too much light from the secondary source can flatten the image instead of increasing its three-dimensional quality.
How Do You Choose the Right Lighting Pattern?
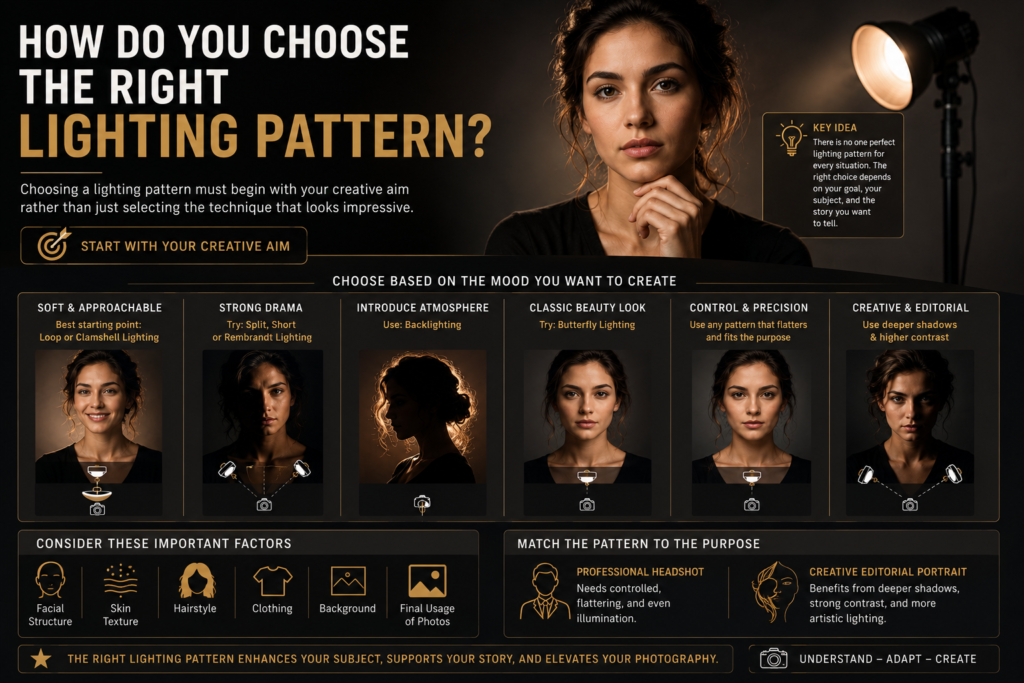
Choosing a lighting pattern must begin with your creative aim rather than just selecting the technique that looks impressive.
For a soft and approachable portrait, loop or clamshell lighting can be a best starting point. If you need stronger drama, split, short, or Rembrandt lighting might work better. Backlighting can introduce atmosphere, while butterfly lighting can create a classic beauty-centered appearance.
You must also consider the subject’s facial structure, skin texture, hairstyle, clothing, background, and the final usage of the photographs.
For instance, a professional headshot might require controlled and flattering illumination, while a creative editorial portrait can take advantage of deeper shadows and brighter contrast.
Natural Light vs. Artificial Light
You do not need expensive studio equipment to practice these approaches. A huge window can become your primary light source, while a white wall, curtain, or reflector can give extra fill.
Outdoor photographers can also apply sunlight, open shade, building surfaces, and reflected light to rebuild many of the same effects.
Artificial lighting simply gives you greater control over intensity, direction, and consistency. Whether you apply a speedlight, strobe, LED panel, or natural window light, basic principles stay the same.
Tips for Practicing Portrait Lighting
The best way to understand lighting is to practice one setup at a time.
Start with a single light source and place it gradually around your subject. Take photographs from each position and compare how the shadows changs take place. Then experiment with the height of the light, its distance from the subject, and the amount of fill.
Pay particular attention to the eyes. Catchlights can add life to a portrait, while extra dark eye sockets can make an otherwise best photograph feel flat or uninviting.
You can also photograph the same subject applying several setups and compare the results. Over time, you will start to recognize how tiny adjustments impact facial structure and mood.
If you enjoy creating expressive images beyond conventional portraits, merging controlled lighting with creative visual storytelling can also open opportunities to produce more unique photographic work.
5 Best FAQs for “9 Portrait Lighting Patterns Every Photographer Should Know”
1. What are portrait lighting patterns?
Portrait lighting patterns describe how light and shadows fall across a subject’s face. They help photographers control the mood, depth, dimension, and overall appearance of a portrait.
2. What is the best lighting pattern for portrait photography?
Loop lighting is a versatile option for many portraits because it creates subtle shadows while maintaining a natural and flattering appearance. However, the best pattern depends on the subject, facial features, and desired mood.
3. What is the difference between short lighting and broad lighting?
Short lighting illuminates the side of the face turned toward the light while leaving more of the face in shadow, often creating a slimmer appearance. Broad lighting illuminates the wider side of the face and can make it appear broader.
4. Can natural light be used for different portrait lighting pattern
Yes. Window light, sunlight, open shade, and reflected light can be positioned or controlled to create many traditional portrait lighting patterns. You do not necessarily need studio flashes or expensive equipment.
5. How can beginners practice portrait lighting techniques?
Start with one light source and experiment with its height, distance, and angle. Photograph the same subject using different setups, compare the shadows and catchlights, and gradually introduce reflectors or additional lights as you become more comfortable.
Final Thoughts
Mastering different lighting techniques gives photographers greater creative control. Rather than simply hoping that available light produces a pleasing result, you can deliberately form shadows, highlights, contrast, and depth according to your vision.
The most effective approach is to become aware of the basics and then test. Every face responds completely differently to light, so treat these techniques as flexible starting points rather than strict rules.
Once you become comfortable with portrait lighting patterns, you can confidently adapt your setup to different subjects, locations, and creative styles. With continuous practice, even simple lighting equipment can let you build portraits that look intentional, dimensional, and professional.